Featured Post

Dodgeball Game Maker Tutorial

This will be a series of posts that will teach you step by step how to make a simple arcade game using Game Maker Studio 2. The final game w...

Saturday, September 26, 2020

Dodgeball Tutorial: Game Over

On this section os the tutorial we will handle the Game Over logic when the player dies and we will display a menu to allow the player to try again or quit the game. The first thing we are going to do it's to create the necessary elements to create the game over menu. The game over menu will contain a text saying that the game is lost and then two different buttons, one to restart the game and the other one to exit the game.

Object to display the menu title

So we will start creating an object that allows us to display text on the screen. We have to go to objects and then create a new group called "interface", this way we have things organized. Now we've to create a new object under this folder called "oMenuTitle". This object won't have a sprite, but it will draw some text on the screen and we will use it for all of our menu titles. On the create event of this object we just need this piece of code:


text = "";
scale = 1;

What we are doing here is initializing the variable "text" with en empty string. A string is simple the text that goes between "". We put the empty string because we will set this property from other objects when creating the Game Over Menu and this way, we can use this object for other menus that we will create in the future. The "scale" property will be used to tell how big has to be the text, we will set it to 3 to actually dispolay the title 3 times bigger than normal.

Now we need a draw event to actually display the text, so create a new event on "Add event > Draw > Draw GUI".

Now we can add this lines of code in the draw event, to actually be displaying the text all frames:


draw_set_halign(fa_center);
draw_set_valign(fa_center);
draw_text_transformed(x, y, text, scale, scale, 0);

With this, we are telling the engine that he has to display the text centered at the position where the object is. So we will have to place this object on the right place where we want the text to appear.

The restart button

Now we are going to create our first button. The first thing we need to do is to improt the sprite for the button. Before importing the sprite, create a new group under "sprites" called "interface" and then another group inside called "buttons", so we can place all of our game buttons sprites here. You can do the same under objects as we will be creating also button objects. Once the folder structure for our interface and buttons has been created, we can create a new sprite under "buttons" and name it "sRestartButton". Now import the restart button sprite from the assets, it can be found under "Assets/Sprites/Interface" and remember to make sure that the origin of the sprite is set to middle center.

Now we can create the restart button object under "Objects/Interface/Buttons" and assign the sprite to it. We are going to use the event "left mouse button pressed" to trigger the button functionallity. So go to "Add event > Mouse > Left Pressed" and add this lines of code:


if  mouse_x > x - sprite_width/2  and mouse_x < x + sprite_width/2
and mouse_y > y - sprite_height/2 and mouse_y < y + sprite_height/2 {
	room_restart();		
}

When mouse left button is pressed this code will run and what it does is to restart the room if the mouse is on the sprite. Note that this code will only work for sprites that have their origin at middle center, so be aware of that.

The exit button

We can do the same as we did for our restart button, but with it's own sprite. The object will be exactly as the restart button, but we will run game_end(); instead of room_restart();. To do this, we will use the duplicate functionallity. Go to the restart button sprite and duplicate it. Now rename it to "sExitButton" and import the exit button sprite from the tutorial assets. Now duplicate the oRestartButton and rename it to oExitButton. Finally, change the code inside the left pressed event with this code:


if  mouse_x > x - sprite_width/2  and mouse_x < x + sprite_width/2
and mouse_y > y - sprite_height/2 and mouse_y < y + sprite_height/2 {
	game_end();
}

And with this, we have all the elements of our Game Over menu, so we can start with the logic for creating the menu.

The Game Over Menu

We will create the game over menĂº when the player is destroyed and for this, we will use the destory event. So open the player object and add a new destroy event with this lines of code:


//Create the game over menu
var menu_title = instance_create_layer(room_width/2, 200, "Interface", oMenuTitle);
menu_title.text = "You Lost!";
instance_create_layer(room_width/2, 400, "Interface", oRestartButton);
instance_create_layer(room_width/2, 500, "Interface", oExitButton);

This code will run when the player it's destroyed and it places the menu title text and the buttons on the screen. Now if we run the game and touch and enemy we will see the game over menu appear, and if we click on the buttons they work.

The only problem it's that while we are on the Game Over menu, the enemies still appear on the screen. So we need to be able to pause our game, when a menu is displayed. So in the next chapter we are going to create the pause menu and implement the logic pause for the Game Over menu.

Thursday, September 17, 2020

Dodgeball Tutorial: Enemy Spawner

On this section of the tutorial we will create an object that spawns enemies on the screen. This will be a logic object and it won't have a sprite, but it will be running code during the game and will be spawning enemies periodically, but first we will set the room layers to start having each thing in the right place.

Setting up room layers

On this section we will configure the room layers. For now we've been putting everything on the instances layer, but this is not the best thing to do it. We will create different layers for the different things that can be in our room.

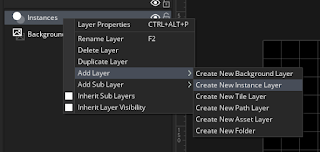
To create a new layer, open the room editor and right click on the instances layer and select create new instances layer:

This way we can create different layers for our objects. We will create this layers and put them on this particular order: Interface, Player, Enemies, Items, Instances, Background. When we finish our layers should look like this:

Now we can delete our objects on the "Instances" layer and add them on they corresponding layer. The player under the player layer and the enemies under the enemies layer. This way we have things organized and it's a good practice to have rooms with layers because we can control what should be drawn on top.

Enemy Spawner Object

The first thing we need to do is to create a new object called oEnemySpawner under the objects folder, and create a create event for it.

On the create event we will define how fast enemies spawn and we will use a alarm event to make an enemy spawn. Alarm events are code that is executed when the alarm triggers and this is usefull for example to make an enemy spawn every 2 seconds for example.

So the create event should look like this:


spawn_rate = 120;
alarm[0] = spawn_rate;

What we are doing here is telling the engine that we will execute the code inside alarm 0 after 120 frames which is equal to 2 seconds, as our game is running at 60 frames per second by default.

Alarm0 event

Now we have to actually create the alarm0 event and put this code inside to actually spawn a random enemy.


//Choose a random enemy to spawn
var random_enemy = choose(oEnemyMedium, oEnemySmall, oEnemyBig, oEnemySpecial);

//Chose a random side to spawn the enemy
var random_side = random(1);

if random_side < 0.25 {
	//Spawn from top
	instance_create_layer(random(room_width), 0, "Enemies", random_enemy);
} 
else if random_side < 0.5 {
	//Spawn from bot
	instance_create_layer(random(room_width), room_height, "Enemies", random_enemy);	
} 
else if random_side < 0.75 {
	//Spawn from left
	instance_create_layer(0, random(room_height), "Enemies", random_enemy);
} 
else {
	//Spawn from right
	instance_create_layer(room_width, random(room_height), "Enemies", random_enemy);
}

//we reset the alarm becase we want to keep spawning enemies
alarm[0] = spawn_rate;

The choose() function accepts multiple arguments and will return one of them randomly, we do this to get a random enemy to spawn as we pass it our enemy objects. Then we choose a random side getting a number between 0 and 1 and checking it's result, being each side 25% possible. Finally we set the alarm again because we want to be spawning enemies all the time. If we don't reset the alarm, the alarm will only be triggered once.

As we can see, alarms are a great tool to execute code that runs periodically but has not to run each frame (as we have the step event for that). But alarms can be used in a lot of case scenarios and they are very easy to use.

Updating the game room

Now we have to put our enemy spawner object into the room and run the game. We can delete the old enemies that we have (to select them we have to select the correct layer first!), as they will be spawning now by code. So select the enemies layer and then remove each enemy. Now, with the instances layer selected, place the enemy spawner object into the room. It doesn't matter where you put it but I like to place them on the top left corner of the room, which is position (0, 0).

Now if we run the game, every two seconds an enemy will spawn in the room and if we wait a bit, soon we will have a room full of enemies that want to kill us!

On the next chapter we will create the game over menu.

Dodgeball Tutorial: Enemy parent and child enemies

Inheritance: creating a parent object and a child object

Now that we have a basic enemy, we will create the other ones, but we will introduce the concept of inheritance, which means that we will have a parent enemy object with the functionality common in all enemies, and then, each enemy will have his own object, having the same parent object. This way we don't have to write the code multiple times and if in the future we want to change something, we can just change it in one place and all child objects will be affected by that change.

The first thing we need to do is to create a new object in the enemy folder called "oEnemyMedium" and assign the "sEnemyMedium" sprite to it. Now we can go to the "oEnemy" and remove it the sprite assignet to it, as the parent won't be instanced in the game, only the children, so there's no need to have a sprite in oEnemy anymore.

Now we will open our oEnemyMedium object and assign the oEnemy as a parent. To do this, we have to go to the parent section of the object and choose oEnemy as the parent of oEnemyMedium.

Now if we go into the room, we won't see our enemy anymore because we've removed the sprite. In the room editor will appear an "?" because our enemy has no image. What we have to do here is to delete the oEnemy and put the oEnemyMedium which is a child of oEnemy and has all it's functionality plus the sprite. So just delete the oEnemy selecting it and pressing the "supr" key, and then drag and drop from the assets tab the oEnemyMedium to the room (make sure that the instances layer is selected). If we run the game now, it will behave exactly as before but we have the parent functionality working and this will speed up the process when creating the other enemies.

Creating the other enemies as childs of our enemy parent object

Now we are going to create the rest of the enemies, so under the enemy folder, we are going to create oEnemySmall, oEnemyBig and oEnemySpecial. We need to create the sprites for those objects aswell inside sprites/enemies. Remember to put the origin of the sprite at middle center just as we did for our player and enemy medium sprites.

Note that the oEnemySpecial has more than one image, this is because it's an animated sprite. When importing the image for this one, we have to select all the images that compose the animation and import all of them into the sprite. So we will have a sprite resource composed of various frames that make an animation.

Now that we have all the necessary sprites for our enemies, we have to assign those to the objects. Also we have to set the parent of those objects to oEnemy, so we tell the engine that this objects will use the functionallity of the parent object. After assigning the parent, the create and step events from the oEnemy should appear in the child.

Now we can add the other enemies to the room and run the game to see that they behaive the same way as they have the same parent.

Changing the behaivour of different childs

It's great to have multiple enemies behaving the same way having the code only in the parent object, but let's add some variety to the behaivour of this children. We will make the small enemy to move faster, the big enemy to move slower and the special enemy to move always towards the player, so let's get started.

If we open our oEnemySmall and right click on the create event we can select the option of "inherit event" which will allow us to run the code in the parent plus some additional code that we want to add to it.

When doing this the code editor will open with a line of code that says "event_inherited()". This functions runs the code in the parent. So we will just add one line of code below, to make this enemy to move faster:


event_inherited();
_speed = _speed * 2;

First we run the code of the create event in the parent, which assigns a initial speed and direction for the object. And then we multiply this speed by two, making it faster.

Now we can do the same for our big enemy but instead of multiply the speed by 2, we will divide it by two, to make it slower. The good thing of this system is that then we can change our value in the parent object and the child objects will adapt it's speed to be twice and half fast of that initial speed that we have set on the parent.

The line of code inside the create event of the oEnemyBig should look like this:

_speed = _speed / 2;

Remember that this line has to go under the event_inherited(); to have it working properly, otherwise we will get an error because the variable _speed won't exist if first we don't call the parent function.

As for our special enemy, we will do the same but on this case, we will inherit the create event and the step event, because this enemy will be slightly different. On the create event we will divide the speed by 4, this will be the slowest of the enemies as it will be following the player constantly.

So add this line in the create event under event_inherited();:

_speed = _speed / 4;

Then do the same with the step event, but on this case, we will put the code above the event_inherited(); because we want to first run some code, and then call the parent code. As on this case the enemy will move towards the player, before calling the moving code of the parent, we will set the direction each frame to point to the player. The code should look like this.


if not instance_exists(oPlayer) {
	exit;	
}
_direction = point_direction(x, y, oPlayer.x, oPlayer.y);
event_inherited();

This code says works this way:

  • If the player don't exist (it has been destroyed) then we exit the event and do nothing, because there is no player to move towards.
  • If the player exists, then we update our direction to move towards the player.
  • Then we run the code of our parent object which moves the enemy.

And with this we are done, we've created multiple enemies that behave slightly different but all of them are using the same code, so if in the future we want to change how all enemies behave, we can just change it in the parent object. This is also usefull because on the Player object we configured the collision with the oEnemy which is the parent, this will allow us to detect collision with any of it's children. Otherwise, we should add a collision event for each enemy that we have in the game and this is not a good solution when we have a game with a lot of enemies.

Now if we run the game, we will se the enemies moving at different speeds and also the enemy special will be moving towards the player always.

On the next chapter we will create an object that spawns enemies in the room every few seconds.

Dodgeball Tutorial: Creating the enemy

Subfolders for creating enemy object and enemy sprite

Just as we did for our player, we need to create an object and a sprite for our enemy, each one, in his folder. As we will have more than one enemy in our game, we can create a subfolder called “enemies” under the “sprites” folder and our “objects” folder. To do this we have to right click were we want to create the subfolder and then select the “create group” option.

Once the subfolders are created, we can create the enemy object and the enemy sprite under that folders. We will name them “oEnemy” and “sEnemyMedium”. Import the sprite for the enemy medium called "enemy39av3" (under the characters/enemies folder) and then assign the sprite to the object, just as we did for our player.

Adding functionality to our enemy

Now we can Place our enemy inside the room, but it still does nothing, so first let's add some code to our enemy. To start things we will create a "create" and "step" events for our enemy obect just as we did for the player. In the create event, we will add two object variables, this variables are visible and shared for all events of this object and they will store the movement information.


_direction = random(360);
_speed = 3;

We are going to use this variables for the enemy movement. The direction variable represents where the enemy is moving and the speed how fast is it moving. Direction it's a number between 0 and 360 as it's in degrees. The speed tells us how many pixels the enemy moves every frame in a given direction.

Now it's time to code the step event using the variables defined in the create event. We want that our ball move in a random direction that's calculated just when the object is created in the create event. After that, the step event will be using that information to actually move the enemy. But we have to control if the ball is going outside the room, because we want it to bounce and stay in the room. So the code to achieve this look like this:


var speed_x = lengthdir_x(_speed, _direction);
var speed_y = lengthdir_y(_speed, _direction);
	
if x + speed_x < 0 or x + speed_x > room_width {
	speed_x *= -1;	
}
	
if y + speed_y < 0 or y + speed_y > room_height {
	speed_y *= -1;
}
	
x += speed_x;
y += speed_y;

_direction = point_direction(0, 0, speed_x, speed_y);

The previous bloc of code in the step event of our enemy does the following:

  1. First we get how many pixels in every axis (x and y) we have to move given this direction and speed. Game Maker has a built in function that calculates this for us, so we can use lengthdir_x(); and lengthdir_y(); to calculate that.
  2. We have to check that the enemy don't go outside the room, so if this happens we multiply the speed x or y by -1 to move in the oposite direction. It's like making the enemy bounce once it arrived at the end of the room.
  3. We update the current position, adding the value of the speeds.
  4. We update the direction because if we have bounced, the direction has changed and we need to update it for the next step.

At this point our Enemy object should look something like this:

Now if we run the game we will see our enemy moving and bouncing when it arrives to the edge of the screen.

Player interaction with enemy

Let's make the player die if it touches the enemy. We are going to do this with a "collision" event. Open the player object and create a new collision event. When selection the collision event, we have to say the collision object which is the oEnemy on this case:

For now, we will only put one line of code on this event:

instance_destroy();

Calling this function will destroy the object, so when the collision event is triggered because the engine has detected that the player object and enemy object are collisioning, the code inside the event will run and the player will be destroyed.

If we run the game now, we will see our enemy moving and we can move our player with the mouse. If the enemy touches us, we will see our player disappear as we make the instance_destroy(); for the player on the collision event.

On the next chapter we will create the rest of the enemies.

Dodgeball Game Maker Tutorial

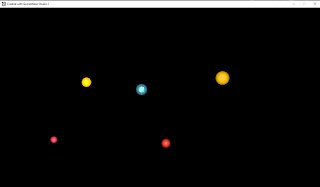
This will be a series of posts that will teach you step by step how to make a simple arcade game using Game Maker Studio 2. The final game will look something like this.

The assets needeed for this tutorial can be downloaded here.

Tutorial Chapters

  1. Getting Started
  2. Creating the player
  3. Creating the enemy
  4. Enemy parent and child enemies
  5. Enemy spawner
  6. Game Over
  7. Game Pause

Dodgeball Tutorial: Creating the player

On this chapter we will create the player object. An object is something that exists in the game, for example a player, an enemy, a pickeable item… Also there are invisible objects which can’t be seen by the player but that have some functionality as to control some logic of the game.

Player Object

To create a new object, you’ve to go to the Assets tab, and right click on the folder “objects” to display the creation menu, and select “Object” to actually create it under this folder. We will name this object “oPlayer”. By convention object names are prefixed with “o”.

Player Sprite

Now that we have a player object, we need a sprite for it, so we can see it ingame. To do this, on the Assets tab, go to the “sprites” folder and create a new sprite just as we did with the player object. We will name this file “sPlayer”. By convention the sprite names are prefixed with “s”.

Once created, the sprite editor will open and we have to click on the import button to import the player sprite. At the beginning of this tutorial there is the link to download the assets needed. Once we click on import, we will have to tell the file we want to import, so we will have to browse to where you downloaded the game assets and select the player sprite inside the characters folder. Once imported, we have to set the origin of the sprite to middle center. To do this, we go to the top left corner of the sprite editor and select “middle center” on the selector. We won't need to do this if we already configured the project to set the sprite origin at middle center by default.

Assign the player sprite to the player object

Now we can close the sprite editor and open the object editor by double clicking on the player object in the Assets tab. On the object editor we can assign the sprite for that object, so we will choose “sPlayer” for the player object.

Adding the player object to the room and running the game

Now we can add our player to the room and run the game to actually see it. A room is like the container of the game elements. By debault Game Maker created a room for us under the folder “rooms” in the Assets tab. We can right click on that room and rename it to “rPlay” (by convention room names are prefixed with “r”).

We can open the room editor by double clicking on the room in the assets tab, just as we did to open the sprite editor or the object editor. From this editor we can add objects to the room, so let’s add the player. First we have to make sure that we are on the “instances” layer. Layers are to tell the engine what needs to be drawn on top. For now, as we have not created our own layers, we will use the default layer to place our player.

With the “Instances” layer selected, just drag and drop the player object to the black room that we have. Now we can run the game to actually see our Player object running! To run the game we can press f5 or click on the arrow on the toolbar.

Once we run the project we can see our player in the room when running the game, it still does nothing but we are going to fix that now.

Controlling the player with the mouse

We are going to make the player to move where our mouse cursor is. This way we can control it and move around the room. To do this, we have to create a step event on the object editor of our player.

Object do things with events. The create event contains the logic that runs when the object is created in the room. The step event is an event that runs every frame of the game, so we want this event to update the player position each frame to be at the mouse position. Once created the step event, a text window will appear were we can put code on it. We want our object to be each frame at the mouse position, so to do this, we can do it with this two lines of code.


	x = mouse_x;
	y = mouse_y;

What we are telling to the engine here is that, the position of the player in the X axis and the Y axis is equal to the current mouse position on each axis. This way each frame we update this position and the player will move as we are moving the mouse. X and Y are built-in variables that every object in Game Maker has. It is the object position and all objects have this position properties.

Now if we run the game, we will be able to move the player with the mouse. But the game still feels boring because the player can’t interact with anything in the game, so let’s fix that by creating our first enemy on the next chapter!

Dodgeball Tutorial: Getting Started

On this chapter of the tutorial we will explain where to get game maker and how we can create the project to start building our game, so let's get started! Also the assets needeed for this tutorial can be downloaded from here.

Download and Install Game Maker

You can download Game Maker from here if you don’t have it. The trial version should be fine to make this game. You only have to register at the web and download and install the lastet version of Game Maker Studio 2 which is 2.3 right now.

Creating the project

After opening Game Maker, we will have several options as we can see in the following image.

We select "new" and then we will select "GameMaker Language".

Then we have to select the folder were we want to store our project and write the project name, on this case we will call it "Dodgeball Tutorial". After that, we will have our new project open and ready to start creating content.

Setting up the project

Before starting creating content in our project, first we will set up a few things. Go to "file > preferences" to open a window that allow us to edit the settings of our project.

Now click on "General Settings" and make sure that the property "Maximum framerate of the GameMakerStudio 2 editor" is set to 60. This will be the target framerate for our game and most of games target this framerate as 60 it's quite common.

Now go to "Sprite Editor" and set the "Default sprite origin" to "Middle Center". The sprite origin represents the position of the sprite when it's placed in the game. We set middle center by default because most of objects in our game will use that configuration.

Now we can click on apply to save the changes made and then, on the Assets tab at the right, open the folder Rooms and double click on Room1 to open the room editor.

Think of a room as a game container where we will put the elements of our game there. What we are going to do here is to set the size of the room. We can do this on the room properties section at the bottom left, set the width to 1280 and the height to 720.

Now with this basic settings we should be ready to go and start creating content for our project! On the next chapter of the tutorial we will create the player!